On this page
This guide will enable you to create an instance of UNE for ArcGIS as an Azure Application Service.
Extra security or enhanced server hardware configuration can be applied as necessary.
If you are upgrading an existing installation, please refer to the Updating an existing installation section at the end of this guide.
Requirements
You will require the following:
- An Azure subscription
- An operational installation of ArcGIS Enterprise
- The UNE for ArcGIS release media
Decide a name for the application – all lower case with no spaces is recommended.
e.g. uneonazure – UNE on Azure in lower case with no spaces.
As required by Microsoft Azure – your name will need to be unique across the whole Azure platform.
Throughout this tutorial replace {appname} with the name you have chosen.
Step 1 – Creating an application in ArcGIS Enterprise
- In ArcGIS Enterprise – use the New item button to add an Application in your My Content. Choose Web mapping as the Application type.
The url will be: https://{appname}.azurewebsites.net/une/ - Click Settings > Register.
For App Type, choose Multiple.
and for Redirect URI, add the http & https version of the final URL and also please add une://launch.html.
e.g.:
https://uneonazure.azurewebsites.net
http://uneonazure.azurewebsites.net
une://launch.html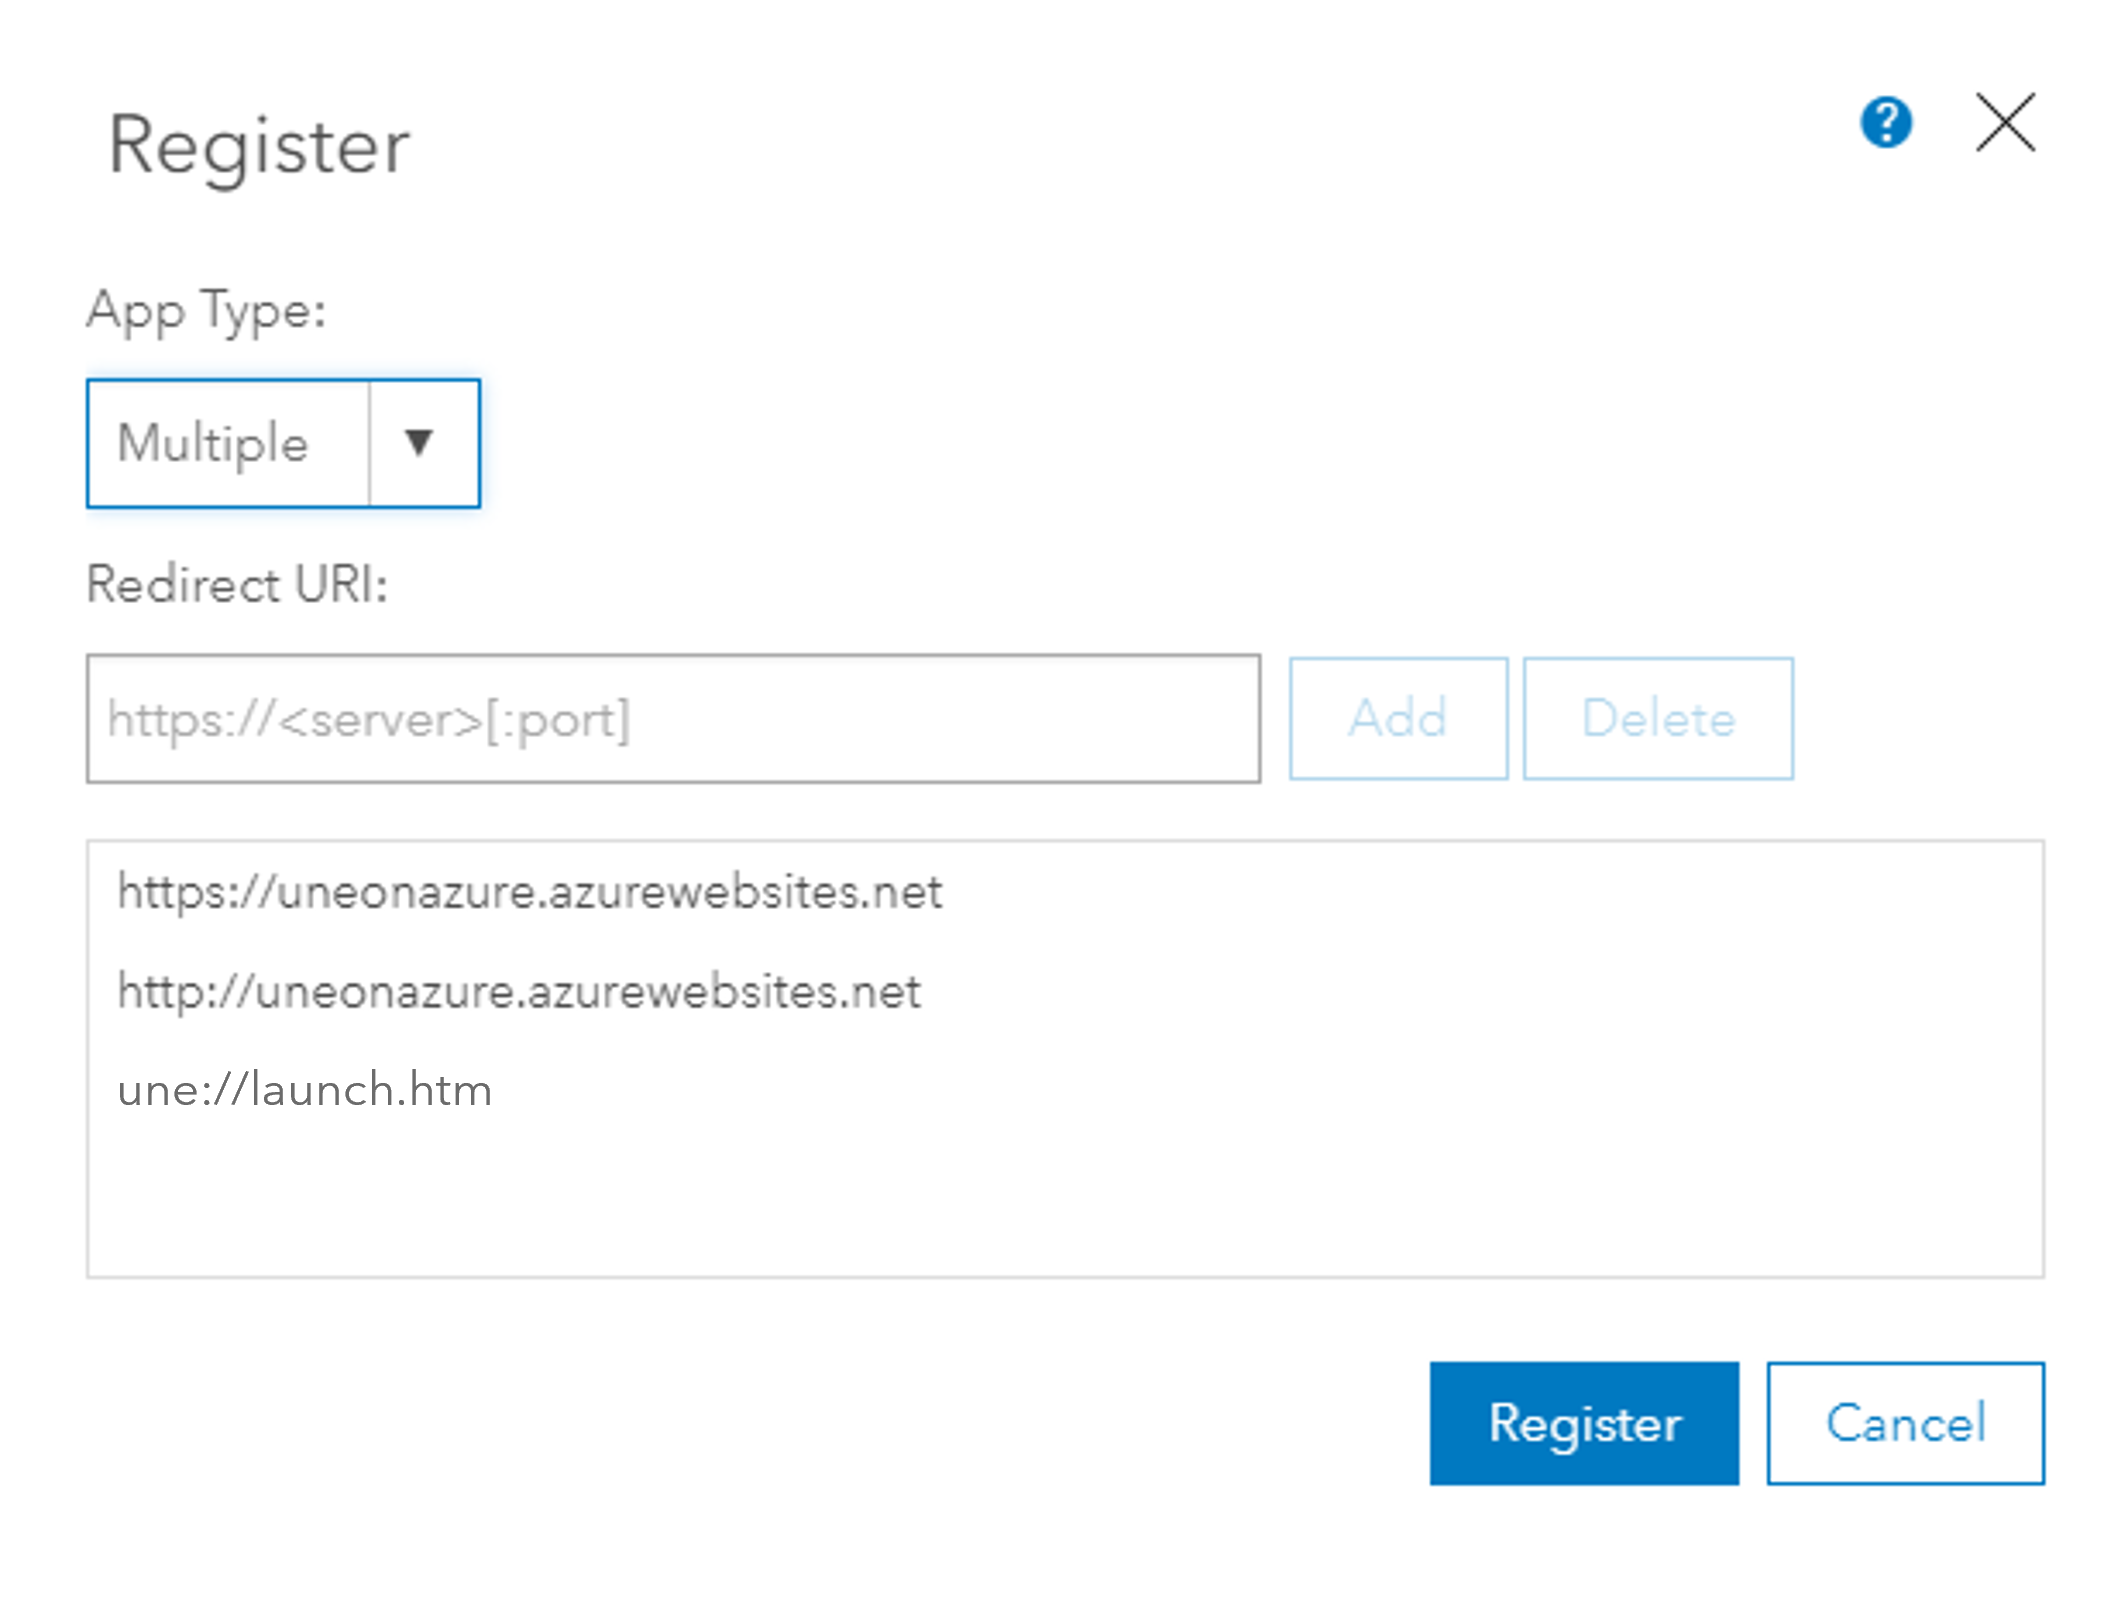
- Take note of the following:
- The Application Item ID – found in the URL for the item
e.g.: 70e5de5b7b8246f3ab624f32e97fbaed - The Registered Client ID – found in the App Registration section
e.g.: eIU03Dgse9iBgjIc - The URL of the portal
e.g.: //un-age-108.techresearch.esriuk.com/portal/
- The Application Item ID – found in the URL for the item
Step 2 – Creating the Azure database for PostgreSQL
The Azure Database for PostgreSQL provides a temporary store for multi-user locking data. This data is used to prevent multiple users editing the same data at the same time.
If there is only ever going to be one server, and loads are small, this component is optional. For multi-server deployments this component is required.
- In Azure Portal, create a resource and select Azure Database for PostgreSQL – this service type can be found under the Database heading.
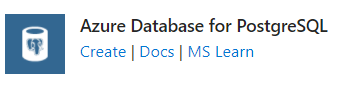 The two options below are both suitable – Single server is easier to set up initially but gives fewer options for tuning the database.
- Fill in the following settings and take a note of them, as these values will be required later:
- Server name (the service’s URL)
- Port Number
- Admin Username
- Password
Please note you should not use the admin username in the configuration sections below – use it only to connect to the database from a suitable client tool and then create a specific user for the UNE application.
- Once your PostgreSQL instance is up and running, you can access it from https://portal.azure.com/ and use the left hand navigation bar to access the following properties: e.g:
- To get the Server name and Port number, select Connection Strings. The server name is of the form
{cache name chosen}.postgres.database.azure.com. - If using SSL (recommended), to get the SSL certificate, select Networking then Download SSL Certificate to get the *.pem file to use in the configuration below.
"host": "une-lock-db.postgres.database.azure.com", "database": "unedb", "user": "postgres", "password": "changeit", "port": 5432, "ssl": { "rejectUnauthorized": false, "ca": "<ssl-certificate-as-base64-contents-of-the-pem>", "key": "", "cert": "" } - To get the Server name and Port number, select Connection Strings. The server name is of the form
If required – more detailed instructions for setting up a PostgreSQL service can be found here.
Step 3 – Creating the Azure application service
In Azure Portal – create a new Web App as follows:
- On the Basics tab, provide the following details:
- Subscription: Visual Studio (or as required)
- Resource Group: As required
- Runtime stack: Node.js (latest stable release of Node.js )
- Operating System: Windows (important – must be Windows)
- Region: Europe North (or as required – chose closest geographically)
- Pricing plan: The default F1 pricing plan is suitable for very low traffic – choose level of plan as necessary.
- On the Deployment and Networking tabs leave all settings at their default value.
- On the Monitoring tab, you can enable Application Insights if you wish. This is optional and not required.
- On the Tags tab, add tags as required. Tags are also optional.
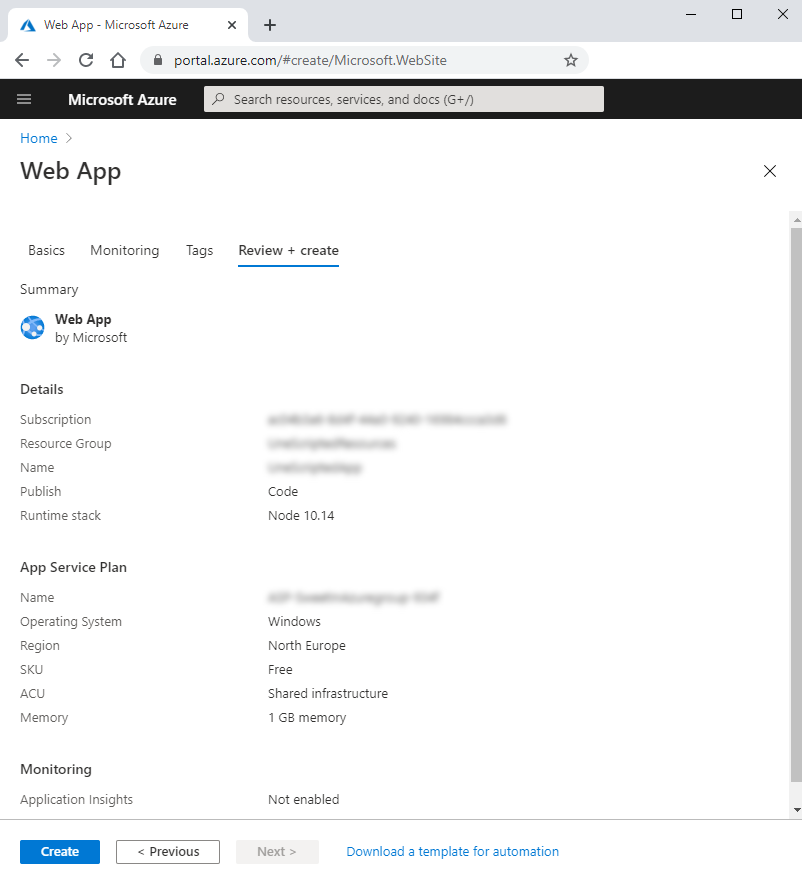
- The Review + create tab might look similar to the one pictured below. If you are happy with the settings, click Create.
Step 4 – Building the deployment package
- Unzip the media provided to a suitable folder.
UNE for ArcGIS media ships with a PowerShell file located in the media zip file:
…\media\installscripts\azure\build_azure_deployment.ps1
This script will create a custom deployment package from the media supplied suitable for deployment on Azure Application Services. - Copy the license file provided to this same folder:
…\media\installscripts\azure\license.json - Open the .ps1 file for editing in any text editor.
- Edit the user configurable section at the top of the file.
####### Edit only this section below ##########

###Name of the Web App Server
$uneonazure = "uneonazure"

###Application Details

# the the Esri portal item - got from the "id=" in the URL
$provisioningAppId = "70e5de5b7b8246f3ab624f32e97fbaec"

# the Esri "App ID" in the "App Registration" section
$provisioningRegisteredClientId = "eIU03Dgse9iBgjIb"

# the url of the portal
$portalUrl = "//un-abcdef.techresearch.esriuk.com/portal/"

###Database Details
$postgressDatabase = ""
$postgressHost = ""
$postgressPort = ""
$postgressUser = ""
$postgressPassword = ""
$postgressCertificateCa = ""
$postgressCertificateKey = ""
$postgressCertificateCert = ""

####### Edit only this section above ##########
- Save and run the PowerShell script.
- After the script completes, a new file will be produced, and its location should be displayed:
../deployment/DeploymentForAZURE.zip
Follow the instructions given on screen and below to deploy the file to azure.
Open a browser to the Azure Console via this URL:
https://{appname}.scm.azurewebsites.net/ZipDeployUI
And drag only the newly generated deployment zip file – DeploymentForAZURE.zip – onto the browser window as follows:
Step 5 – Configuring
Browse to Azure Portal and for the application created in Step 2 above, apply the following changes:
- Web sockets
Turn Web sockets On.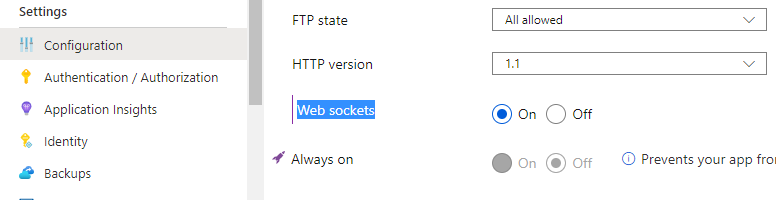
- Set Path Mappings
In the Path Mappings tab, add the following two mappings: Important: Ensure that you un-tick the directory check box, so that they are both listed as applications.
Important: Make sure to press Save to save the changes. It will not auto save them.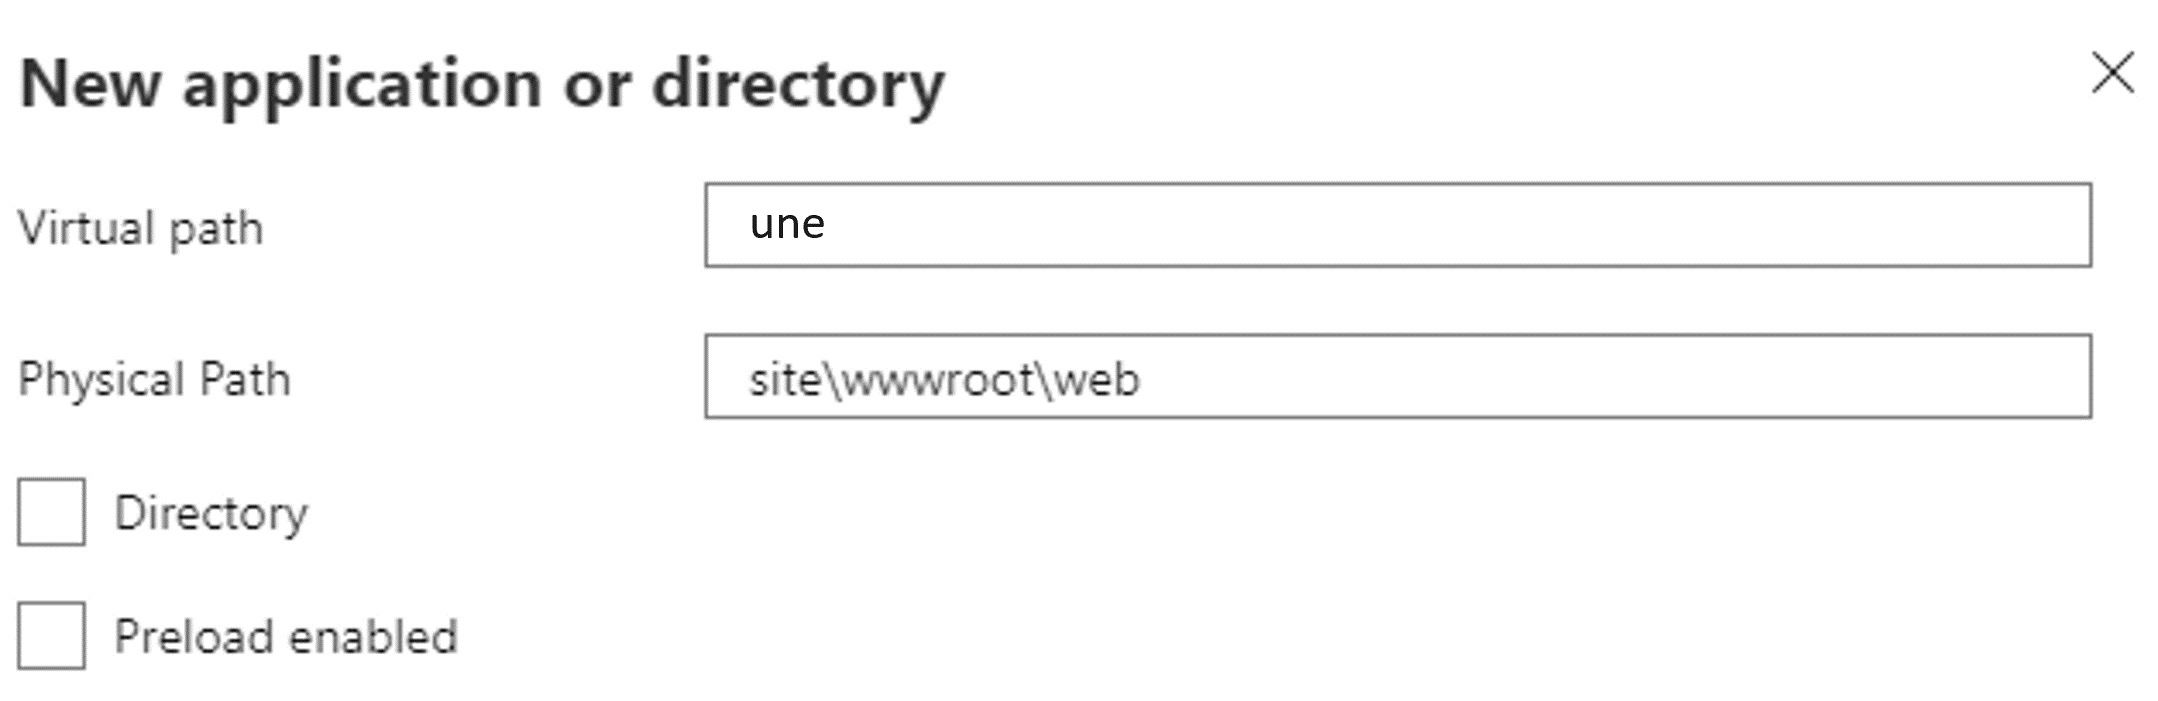
- une -> mapped to site\wwwroot\web
- uneserver -> mapped to site\wwwroot\server
- une -> mapped to site\wwwroot\web
- uneserver -> mapped to site\wwwroot\server
- une -> mapped to site\wwwroot\web
- uneserver -> mapped to site\wwwroot\server
- une -> mapped to site\wwwroot\web
- uneserver -> mapped to site\wwwroot\server
- une -> mapped to site\wwwroot\web
- uneserver -> mapped to site\wwwroot\server
- une -> mapped to site\wwwroot\web
- uneserver -> mapped to site\wwwroot\server
- une -> mapped to site\wwwroot\web
- uneserver -> mapped to site\wwwroot\server
- une -> mapped to site\wwwroot\web
- uneserver -> mapped to site\wwwroot\server
- une -> mapped to site\wwwroot\web
- uneserver -> mapped to site\wwwroot\server
- une -> mapped to site\wwwroot\web
- uneserver -> mapped to site\wwwroot\server
- Install dependencies using npm
From the Console in the web browser (see screenshot below) run the following:cd servernpm install
Step 6 – Testing
If any of the following fail, try restarting the Web Application.
- Deployed Files Location
Look in the Azure Console at the following link: https://{appname}.scm.azurewebsites.net/dev/wwwroot/
and check the deployed folders are visible. - Testing Server Installed OK
Test node components by opening the following URL: https://{appname}.azurewebsites.net/uneserver/serverinfo
e.g.:
https://uneonazure.azurewebsites.net/uneserver/serverinfo - Testing Server Functionality
Test Socket Server by opening this url (exact message content displayed in the response will differ):
https://{appname}.azurewebsites.net/uneserver/socket.io/?ns=&transport=polling&t=
If you get an error here, make sure you have completed thenpm installin step 5.
More details on any server-side error can be seen by clicking on the Azure Log Stream in the Monitoring section of the Azure Application Service.
You can now visit your site at: https://{appname}.azurewebsites.net/une/. This should redirect you to your Enterprise Server for you to login – then redirect again to the main page of the new UNE for ArcGIS Builder page.
Updating an existing installation
If you have an existing Azure UNE for ArcGIS installation and need to update it while preserving the configuration –
You will need to obtain these settings used when last deploying the application:
- The URL of the ArcGIS portal
- The application item IDs from the Enterprise application registration
- The connection settings for the PostgreSQL database
You will also need the following files:
- The provided media zip package
- The provided licence file
If the above settings are known, you can proceed to the sections to Step 4 – Building the deployment package.
If these settings are unknown, they can be found in the uneconfig.js file in the \web\appconfig folder, using the Azure App Service Editor (available from the sidebar in the Azure Console).
The licence file une-lic.json can also be retrieved from the \web\appconfig folder.
The web client settings can be found in the file appconfig.js highlighted above, e.g.:
provisioningRegisteredClientId: "eIU03Dgse9iBgjIb",
provisioningAppId: "70e5de5b7b8246f3ab624f32e97fbaec",
portalUrl: "…"
The UNE for ArcGIS licence file license.json, highlighted above, can also be found in this folder.
The Postgress settings can be found in the file config.json highlighted above, e.g.:
   "pg": {
        "user": "uneuser",
        "host": "localhost",
        "database": "unedb",
        "password": "unepg",
        "port": 5432,
        "ssl": null
    }
The origins settings can be found in the file config.json highlighted above, e.g.:
   "origins": [
      "https://<SERVERURL>.com"
   ]
Keep a note of these settings. You can now continue at Step 4 – Building the deployment package.