On this page
In a UNE application, new features are created using feature templates. A feature template specifies the default values for the fields in a particular layer, when creating new features. The templates are either defined in the underlying feature services, or by configuring new templates in the Manage Templates area of the builder. The templates are directly related and dependent on the layer for which they have been defined.
Smart templates provide an alternative to the layer based feature templates. Instead of being related to a layer, the application builder chooses their own set of properties and the geometry shape they wish the user to capture on the map. After the shape and properties have been captured, this information is used to add one or more features in different layers in the map. For example, a smart Template for an Orchard, would allow the user to digitise a polygon and specify how many trees it is to contain. When the user has finished entering these details, the smart template would then create many individual tree features.
Attributes
A smart template consists of the following configuration attributes.
Name required
The name to display to the end user, so that they can recognise, and choose the template. This will appear in the Choose panel in the client application.
Icon required
The icon to display to the end user. This will appear in the Choose panel, and in the header of the client application. It is used to help easily identify the chosen template.
Type of capture required
This defines the type of shape, that the user will need to digitise on the map.
Capture feedback optional
This defines additional graphics, labels and HTML overlays to display on the map, as the user digitises the smart shape. It is dynamic, and will change as the user enters the geometry or settings.
Capture move feedback optional
This is more advanced form of interactive feedback. It allows feedback to be shown on the map as the user moves their mouse/pointer.
Parameters optional
This is a set of properties that the user will be expected to enter to determine the behaviour of the template. These parameters will be used by the tasks, to decide what data to write.
Tasks optional
Once the user has entered the shape and parameters, tasks are used to write/update data in the geodatabase. Tasks allow features to be added / modified / deleted across all the different layers in the web map.
Defining a smart template
Smart templates are defined on the Create Panel.
- Click the Create button on the wireframe header.
- In the left-hand panel, scroll to the Feature Templates section.
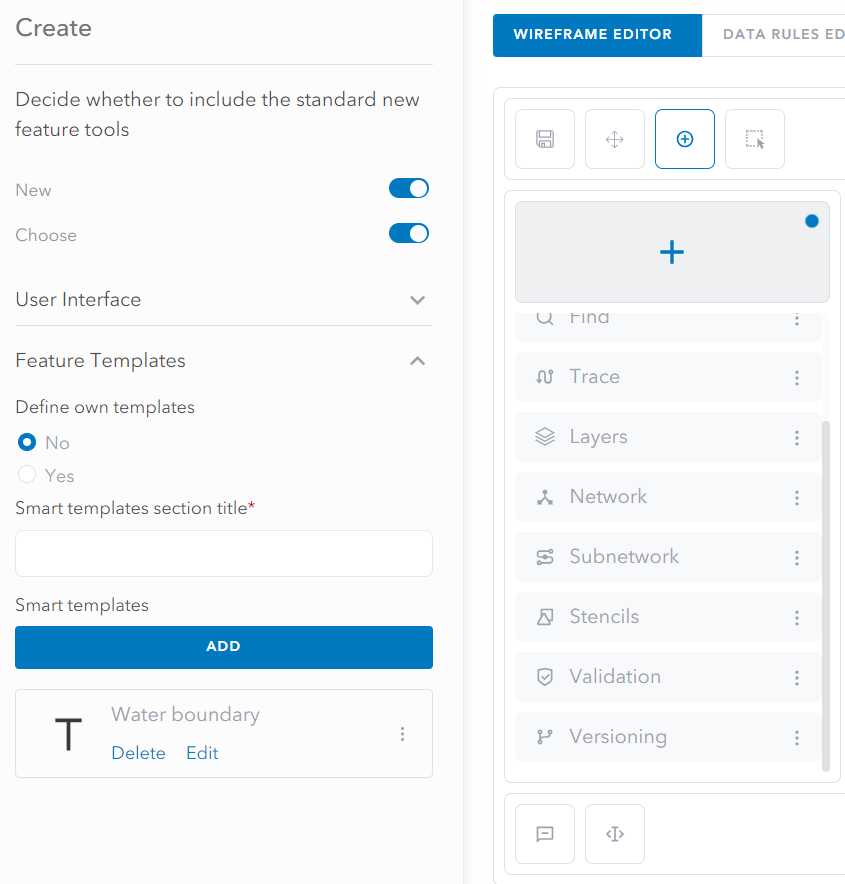
- Find the Smart Templates sub-section.
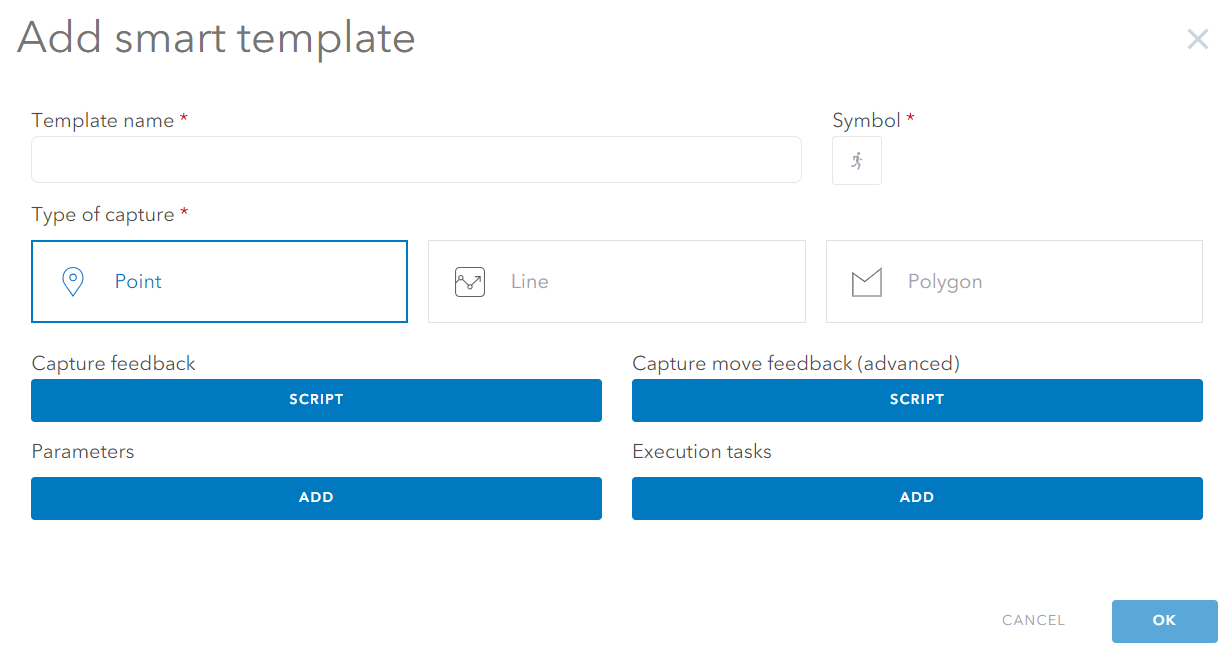
- Click Add to open the smart template dialog.
- In the dialog, please enter the Template name, Symbol and Type of capture.
Z enabled UNE
Select whether the smart template is Z Aware.

Select the type of Z capture.

- Now enter the Capture feedback, Parameters and Execution tasks. The sub-sections below explain how these can be defined.
- Click OK. This will add the smart template to the application.
Note: Smart templates will automatically be added onto the end of the list of templates available to the end user. If you would like to choose a different section name, provide a value in the Smart Template Section Title. Alternatively use Define own templates and the Manage Templates option to completely re-organise the list of templates available to the end user.
Defining feedback
Capture feedback is used to provide feedback to the end user as they use the smart template. It is optional, but allows for a very interactive experience.
Capture feedback is defined using an Arcade script. The script will be run and re-run in response to a number of events.
- When the user first chooses New, and has the smart template selected.
- Whenever the user digitises a point on the map. This may be a point that forms part of a wider capture shape.
- Whenever the user interacts with the Properties of the smart template.
The script is able to specify graphics, labels and/or HTML overlays that are to be added to the map. The script will remove previous items on every execution.
return {
    graphics: <Array of Graphics>,
    html: '<An HTML overlay>',
    labels: <Array of HTML labels>
    pointermove: <Optional [Advanced] can be used to switch off the move script>
    action: <Optional [Advanced] return 'noop' to keep graphics>
}
To understand how to return graphics, HTML, and labels, please see the sub-sections below.
If the script returns null, all feedback will be removed from the map, and the mouse move feedback will be disabled.
The pointermove and action parameters are advanced properties which can be used to provide more fine grained control over the behaviour.
The following advanced script will cause the app to keep its graphics and overlays. It can be used to reduce the amount of graphics churn. All graphics will still be removed at the end of the operation.
return {
    action: 'noop'
}
The following script, can be used to prevent mouse/pointer move from firing.
return {
    pointermove: false
}
Script globals
When executing the script, the engine will have access to a number of globals. These will change depending on the event. The following explains their purpose:
$captureGeometry: This is the geometry the user has captured. It will only be available when the user is entering/modifying the templates properties.$captureProperties: This is a dictionary that will hold the values of the properties the user is expected to enter. It will always be available, but will initially hold the default values defined in the template.$drawingShape: This will be the shape that is being interactively digitised. It will start of as a point but as the user digitises more vertices, it will change. It is not available after the user has entered the shape;$captureGeometryshould be used instead.
Defining a return graphic
The following is an example script that returns a graphic to be added to the map. It is possible to add more than 1 graphic in conjunction with labels and/or HTML overlays.
var graphs = [];
push(graphs, {
    geometry:  geom,
        symbol: `{
                "type": "esriSFS",
                "color": [0, 0, 0, 64],
                "outline": {
                "type": "esriSLS",
                "color": [0, 0, 0, 255],
                "width": 0.75,
                "style": "esriSLSSolid"
                },
                "style": "esriSFSSolid"
                }`
        });

return  {
      graphics: graphs
}
Defining a return label
Labels are effectively pull out notices that are shown on the map. They consist of a line connector, and some HTML content.
UNE will automatically lay out the labels as best it can using heuristics to prevent label overlap.
A label requires a map point, the HTML to show with the connector, and optionally a colour, if the default is not the preference.
var labels = []
var pt = Point({x: 100, y:100, spatialReference: {wkid: 102100}});
var name = "Hello world"
push(labels,{
              pos: pt,
              // color: '#ff49e1', // Optional
              html: `<div style="padding:5px; max-width:100px; color:#ff49e1; font-size: 12px; font-family: system-ui;">
                ${name}
                </div>`
})

return  {
    labels:labels
}
Defining a return overlay
Any HTML can be added to the map. It will be draped over the map.
The engine will only accept a subset of HTML. The HTML will be validated and checked before it is added to the page.
var somevalue = 10.222;
var html = `
<div class="float-right" style="width:200px; margin-left:30px; margin-top:30px; margin-right: 74px;">
    <div class="card" style="background-color: white; border-radius: 20px;">
        <div class="card-body rounded p-3">

      <table class="table table-sm mb-0">

  <tbody>
    <tr>
      <td class="border-top-0">Materials</td>
      <td class="border-top-0">
        <span class="badge badge-success">£0</span>
       </td>
    </tr>
    <tr>
      <td>Reinstatement</td>
      <td>
        <span class="badge badge-info">£${round(somevalue,2)}</span>
      </td>
    </tr>
    <tr>
      <th>Total</th>
      <th>
        <span class="badge badge-danger">£${round(somevalue,2)}</span>
      </th>
    </tr>
  </tbody>
</table>

        </div>
    </div>
</div>
`
return {
    html: html
}
Defining mouse/pointer feedback
Smart templates can provide interactive feedback as the user moves their mouse or hovers over the map.
Mouse feedback is considered an advanced customization and comes with a number of limitations/expectations.
- The script must be fast. The script is executed continuously and therefore, if used incorrectly, the user will have a poor experience.
- The script is synchronous. No data can be fetched in the script, and access to map layers / feature sets has been disabled.
Mouse/pointer move feedback will not execute, if the the standard feedback script has returned null.
The script can return labels, graphics, and/or HTML.
When the script is called as part of a data update rather than a mouse move, the following can be returned:
return { action: 'noop' }
This will retain all previous graphics and alike on the map.
Script globals for pointer move
When executing the script, the engine will have access to a number of globals. These will change depending on the event. The following explains their purpose:
$event: The type of mouse operation. This may bemove,hover, ordataupdate.dataupdatewill be used when the script is executed directly after the standard feedback has run, but not in response to a mouse move.$captureProperties: This is a dictionary that will hold the values of the properties the user is expected to enter. It will always be available, but will initially hold the default values defined in the template.$drawingShape: This will be the shape that is being interactively digitised. It will start of as a point but as the user digitises more vertices, it will change.$pointerPoint: This is the current pointer location. Will be null in adataupdatecall.$drawingSegment: The current segment being drawn.
Specifying properties
Properties allow the smart template to change its behaviour according to user entered values.
For example, the user could change how many trees to create, or the spacing or some other set of settings.
Parameters are added using the Add button on the parameters list.
The following types are supported:
- Text
- Number
- Date
- Date and Time
- Portal User
- Check box
- Layer in Map
- Choice
Writing data
Data is written or updated using tasks. A smart template can have one or more tasks. Each task is responsible for preparing changes to the data.
The following task types are available:
- Add Records: Adds new records to a layer
- Delete Records: Deletes records from a layer
- Modify Records: Modifies a set of records in a layer
- Add, Delete, Modify: Adds, modifies and/or deletes records in a layer
- Multi Layer Add, Delete Modify: Writes changes across many layers.
The scripts will have access to the following globals:
$captureGeometry: The geometry captured for the smart template.$captureProperties: The properties entered by the user for the smart template.
Please refer to the Execution Tasks section under Developers to better understand how to update data.
Limitations
Smart templates have a number of limitations:
- Topology: Smart templates write data directly to the database. This means that the topology rules do not run. It is necessary to ensure that any data you add or modify is topologically correct according to the required rules.
- Attribute Rules: As the data is written directly to the database, the attribute rules are not run. It is necessary to ensure that any data added/modified has correct values. Attribute rules specified on the server will be run.
- Validation: As above.
It is possible when writing tasks to instruct the system to crack and cluster related features. Cracking and clustering is a low level topology primitive, that ensures that vertices that are too close together are clustered together, and missing vertices are introduced on line segments where segments cross.
To ask the engine to crack and cluster, the following must be added to a task output. If this is encountered, the engine will run cracking and clustering as a final activity.
return {
    ...
    crackandcluster: true
}
Script helpers
Batch creating features using tasks and Arcade can be challenging and verbose. For this reason a number of helper functions are included to help generate new features.
The following Arcade functions can be used both in returning feedback and constructing features:
createFeature: A function which will build a new arcade feature for a layer. It will have all the correct fields for the layer. Optionally a template can be used. In this case, the feature will use the default values from the template:var f= createFeature({layername:'Trees', geometry: pt})symbolFromFeature: This function will get the correct symbol for a feature in a given layer. This is helpful for constructing dynamic feedback, and adding temporary graphics to the map:var sym = symbolFromFeature(feat, { layername:'Trees'})featureBuilder: This function will create a set of features, given an input shape. This function works in a similar fashion to ArcGIS Pro Group Feature Templates and Feature Builders. The following shows different ways of creating features using the featureBuilder function/** Get a new point feature using 'multiple-point-features' * * This operation expects a point geometry to be used. It will create a * new feature initialised with the same geometry */ var feats = FeatureBuilder({ method: "multiple-point-features", geometry: pointGeom, layername: "Trees", template: "Birch" //optional }); /** Get a new point feature at the start of a line 'point-at-start-of-line' * * This operation get a feature at the start of a line. It can optionally * take an offset-distance and side (left or right), and/or a distance-along. * The distance-along should specify the type of distance, 'proportional' * or 'distance' */ var feats = FeatureBuilder({ method: "point-at-start-of-line", geometry: lineGeom, layername: "Trees", template: "Birch", //optional "offset-distance": 10, //optional "offset-side": "left", //optional "distance-along": 10, //optional "distance-along-type": "distance" //optional }); /** Get a new point feature at the end of a line 'point-at-end-of-line'' * * This operation get a feature at the end of a line. It can optionally * take an offset-distance and side (left or right), and/or a distance-along. * The distance-along should specify the type of distance, 'proportional' * or 'distance' */ var feats = FeatureBuilder({ method: "point-at-end-of-line", geometry: lineGeom, layername: "Trees", template: "Birch", //optional "offset-distance": 10, //optional "offset-side": "left", //optional "distance-along": 10, //optional "distance-along-type": "distance" //optional }); /** Get new point features at every vertex of a line * 'point-at-every-vertex-of-line'' * * This operation gets features for every vertex of a line. It can optionally * take an offset-distance and side (left or right), and/or a distance-along. * The distance-along should specify the type of distance, 'proportional' * or 'distance' */ var feats = FeatureBuilder({ method: "point-at-every-vertex-of-line", geometry: lineGeom, layername: "Trees", template: "Birch", //optional "offset-distance": 10, //optional "offset-side": "left", //optional "distance-along": 10, //optional "distance-along-type": "distance" //optional }); /** Get new point features at every vertex of a line, except the end. * point-at-every-vertex-of-line-except-end' * * This operation gets features for every vertex of a line except the end * vertex. It can optionally take an offset-distance and side (left or right), * and/or a distance-along. The distance-along should specify the type of * distance, 'proportional' or 'distance' */ var feats = FeatureBuilder({ method: "point-at-every-vertex-of-line-except-end", geometry: lineGeom, layername: "Trees", template: "Birch", //optional "offset-distance": 10, //optional "offset-side": "left", //optional "distance-along": 10, //optional "distance-along-type": "distance" //optional }); /** Get new point features at every vertex of a line, except the start. * point-at-every-vertex-of-line-except-start' * * This operation gets features for every vertex of a line except the start * vertex. It can optionally take an offset-distance and side (left or right), * and/or a distance-along. The distance-along should specify the type of * distance, 'proportional' or 'distance' */ var feats = FeatureBuilder({ method: "point-at-every-vertex-of-line-except-start", geometry: lineGeom, layername: "Trees", template: "Birch", //optional "offset-distance": 10, //optional "offset-side": "left", //optional "distance-along": 10, //optional "distance-along-type": "distance" //optional }); /** Get new point features at every vertex of a line, except the start and end. * point-at-every-vertex-of-line-except-start' * * This operation gets features for every vertex of a line except the start * and end vertex. It can optionally take an offset-distance and side (left * or right), and/or a distance-along. The distance-along should specify * the type of distance, 'proportional' or 'distance' */ var feats = FeatureBuilder({ method: "point-at-every-vertex-of-line-except-start-and-end", geometry: lineGeom, layername: "Trees", template: "Birch", //optional "offset-distance": 10, //optional "offset-side": "left", //optional "distance-along": 10, //optional "distance-along-type": "distance" //optional }); /** Get new point feature at the centroid of a geometry. 'centroid' * * This operation gets a new feature at the centroid of a Geometry */ var feats = FeatureBuilder({ method: "centroid", geometry: Geom, layername: "Trees", template: "Birch" //optional }); /** Get a new polygon feature using 'multiple-polygon-features' * * This operation expects a polygon geometry to be used. It will create * a new feature initialised with the same geometry */ var feats = FeatureBuilder({ method: "multiple-polygon-features", geometry: PolygonGeom, layername: "Trees", template: "Birch" //optional }); /** Get a new polyline feature using the boundary of a polyline, using * 'single-line-feature-boundary' * * This operation expects a polygon geometry to be used. It will create * a new feature initialised with a line representing the boundary */ var feats = FeatureBuilder({ method: "single-line-feature-boundary", geometry: PolygonGeom, layername: "Trees", template: "Birch" //optional }); /** Get a new point from the first vertex of a polygon using * 'point-at-start-of-polygon' * * This operation gets a features for the first vertex of a polygon */ var feats = FeatureBuilder({ method: "point-at-start-of-polygon", geometry: PolygonGeom, layername: "Trees", template: "Birch" //optional }); /** Get new point features at every vertex of a polygon using * 'point-at-every-vertex-of-polygon' * * This operation gets features for every vertex of a polygon */ var feats = FeatureBuilder({ method: "point-at-start-of-polygon", geometry: PolygonGeom, layername: "Trees", template: "Birch" //optional }); /** Get new point features at every vertex of a polygon except the first * point using 'point-at-every-vertex-of-polygon-except-start' * * This operation gets features for every vertex of a polygon except the start * vertex */ var feats = FeatureBuilder({ method: "point-at-every-vertex-of-polygon-except-start", geometry: PolygonGeom, layername: "Trees", template: "Birch" //optional }); /** Get new feature by buffering an existing geometry 'buffer' * * This operation gets a new feature as a buffer of an existing one */ var feats = FeatureBuilder({ method: "buffer", geometry: Geom, layername: "Trees", template: "Birch", //optional distance: 10 });